Dive in Watercolour in 2024
Creativity and watercolour are a marriage made in art heaven. The benefits of expressing creativity through painting with vibrant watercolours are many - from honing one’s dexterity, to increasing their intuitive thinking skills, to just managing stress and relaxation. Not to mention having all that fun smearing around paint, learning how colours blend and making creative works of art – what more could you want? So take the plunge into the world of watercolour painting today, you’ll thank yourself later!
“You will see, in the future I will live by my watercolours” - Winslow Homer
What is watercolour paint used for?
Known for its translucency, watercolour is a water-soluble paint made of pigments suspended in a water-based solution. This flexible and non-toxic colouring medium works well in a wide range of arts and crafts projects.
Pigments can come from organic materials (plants and insects), inorganic materials (minerals and rocks), or can be man-made or synthetic.
Watercolour paints are used to create beautiful, transparent watercolour paintings.
When compared to oils and acrylics, watercolours are:
- Easy to clean up (with soap and water)
- Dry quickly
- Portable (light and easy to transport)
- Inexpensive
- Less wasteful (easily to reuse by adding water)
- Transparent
Watercolour is very different to acrylic, oil and gouache. Each of these different paint mediums require different techniques.
With watercolours, the coloured pigments remain suspended in the water, until the water evaporates and dries. Water dries quickly, which often means the artist needs to make quick decisions! As a result some people find watercolours challenging.
How to judge the amount of water?
As a watercolour beginner, it’s difficult to gauge how much water you should be using in relation to the amount of paint.
Often enough, you use too much water because you intuitively think that a water-based medium should use a lot of water.
Too much water will dilute the paint and make it difficult to control because the water will flow all over your paper. If this happens, you may end up ruining your painting if you aren’t careful.
So, to fix this common watercolour mistake, you need to master water control.
As a watercolour beginner, make sure you lay down a wash that is evenly glossy on the paper. To check if you have the right amount, tilt your paper in the light. If you see an even sheen of water, you’re good.

Equipment
Before starting to paint, take some time to prepare your palette. There are different types of palettes used for watercolours.
The first is the well palette; this uses a flat surface with indentations where pigment is kept.
The second type is the half-well palette, similar to the standard well palette but smaller, holding less paint.
The third type is the palette cup, used mainly with watercolour pencils and pastels; a palette cup allows a small amount of water to be placed above your pigment for easy access.
The equipment includes:
- paintbrushes
- watercolour paint
- watercolour paper
- a spray bottle, pipette or eye dropper
- a small sponge
- tissues
- paper towels

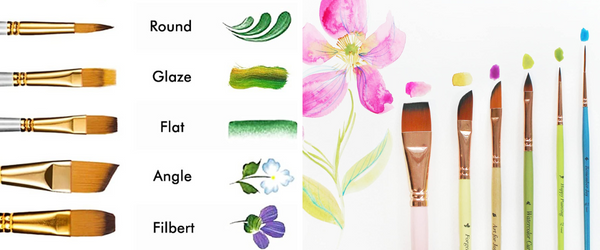
Paintbrushes
A good watercolour paintbrush should be able to hold a good amount of water in it, maintain a fine point or end and also distribute paint smoothly onto your paper.
Round brushes: Round brushes are the most versatile and widely used for watercolour painting. Their shape makes them suitable for small details and delicate lines, but also for broader strokes and washes.
Flat brushes: While not as versatile as round brushes, flat brushes are great for washes as strong linear strokes.
Filbert brushes: Flat and tapered to a point, filbert brushes produce a characteristic stroke well suited to precision techniques and glazing. They are often used to paint foliage.
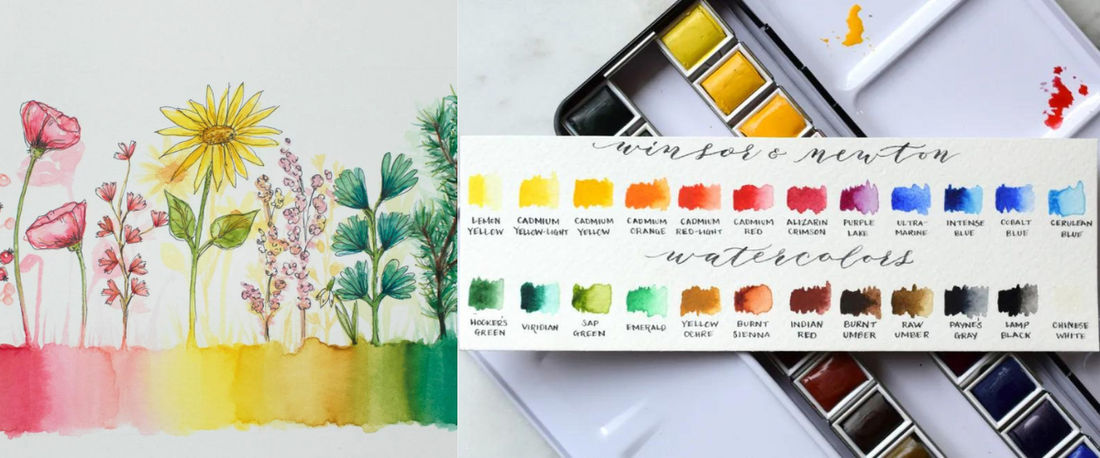
Watercolour paint
Essentially there is no difference between a tube and pan. The only difference is that the pan paint has been poured and dried. In fact you can create your own pans from tubes by simply squeezing your favourite colours into empty pans.
Watercolour paint in pans comes as rectangular or circular “cakes” that are fitted into individual pans. They are extruded under pressure, which compresses them into the cakes. They’re dry to the touch, but when you dab a wet brush in the watercolour, it is “activated.”
Pans are easier to transport, so perhaps better for painting outdoors rather than in a studio environment.
However, when working in larger areas or creating watercolour washes, the concentrated vibrancy of the paint from a tube can give you more control.
You can use watercolours in a pan and from a tube in the same painting. You can even mix one colour from a tube and combine it with another from a pan.
Watercolour Paper
Watercolour Paper plays an important role in watercolour painting.The type of paper used will behave differently with the amount of water present in a wash and so affect the colour that is laid down. It will also affect the way the pigment gathers which can simply add interest or define a form.
Most of all it is the whiteness of the paper that gives watercolour its glow as it shines through pale washes or makes for strong highlights when left exposed. The areas ‘left out’ are just as vital to the finished piece as the areas of painting.
The amount of pressure during the compression process determines the different kinds of watercolour paper surfaces:
- cold pressed (semi-compressed)
- rough (loosely compressed)
- hot pressed (very compressed)

Watercolour paper can be made with different materials and weight:
Materials
- Cotton (which is the most recommended paper to use)
- Wood Pulp (using a chemically treated pulp with lignin (which gives wood its rigidity) removed.
Weight
- 190 gsm
- 220 gsm
- 300 gsm which is the most recommended paper to use
The best paper for watercolour is one that has a weight of 140 lb. or 300 GSM
The most common watercolour paper weights are 190 gsm, 300 gsm, 356 gsm, and 638 gsm.
Watercolour techniques
There are many different techniques to wrap your head around when using watercolour painting for beginners but to get started you should first understand ‘wet-on-dry’ and ‘wet-on-wet’. It’s important to know these two techniques as they both produce very different results.
Painting wet-on-dry produces sharp edges to shapes, whereas painting wet-on-wet spreads the colours into one another producing soft edges and blending. Knowledge of this will help you predict what the end result will look like.
Wet on wet:
To create this effect, you should start by dampening your paper before adding paint. This will create a lovely feathery technique that offers a lot of artistic possibilities.
Wet on dry:
A beautiful beginner’s technique that allows the semi-transparent nature of the watercolours to really shine. A wash is applied to the paper which is then allowed to dry. Then you paint on top with your wet brush, allowing the base colour to be visible through the top colour.

If you would like to know more about how to spark your creativity, check out our workshops to discover your dormant talent!